Herbs
Exodus 30:
34 And the (LORD) YHWH said unto Moses, Take unto thee sweet spices, stacte, and onycha, and galbanum; these sweet spices with pure frankincense: of each shall there be a like weight:
נָטָף nataph stacte
Matthew 15:
13 But he answered and said, Every plant, which my heavenly Father hath not planted, shall be rooted up.
Herbalist gilde
een vereniging van kruidengeneeskundigen
https://herboristengilde.nl/hoe-word-ik-een-herborist/
https://vanderpigge.nl/blog/kruidengeneeskunde-hoe-werkt-het/
Herbalist guild
an association of herbal practitioners
https://americanherbalistsguild.com/
Rodale's Illustrated Encyclopedia of Herbs Hardcover – May 1, 2000
Prepper's Natural Medicine: Life-Saving Herbs, Essential Oils and Natural Remedies for When There is No Doctor Paperback – June 9, 2015
Duizendguldenkruid
Rode klaverbloesem
https://draxe.com/nutrition/top-10-bible-foods-that-heal/
https://draxe.com/nutrition/the-top-14-herbs-of-the-bible/
https://www.healthline.com/health/migraine-herbal-home-remedies-from-around-the-world#valerian
https://anniesheilzamekruiden.eu/nl/Rode-klaverbloesem/H2-2


חֶלְבְּנָה chelbĕnah / galbanum
-
a kind of resin or gum, ingredient of the holy incense
Galbanum is een hars, bestaande uit gestold melksap afkomstig van de plant Ferula gummosa (geslacht Ferula). De plant komt voornamelijk voor op berghellingen in Iran.

Galbanum


Galbanum is een hars, bestaande uit gestold melksap afkomstig van de plant Ferula gummosa. De plant komt voornamelijk voor op berghellingen in Iran.
Er zijn 2 types galbanum, namelijk "Levantijnse of zachte galbanum" en "Perzische of harde galbanum". De "zachte galbanum" heeft een gele tot rode kleur.
Wierookhars Galbanum
לְבוֹנָה lĕbownah / frankincense
-
a white resin burned as fragrant incense
-
ceremonially
-
personally
-
used in compounding the holy incense
-


https://www.onszaden.nl/boswellia_sacra
https://www.voedselbos.eu/bedrijf/hetbedrijf.html
https://www.sarcraft.com/news/eastern-redbud-edible-and-medicinal-uses
https://www.directplant.nl/tuintips/kiwi/
https://www.tuinkrant.com/artikel/bloei-bestuiving-bij-kiwi-man-vrouw-herkennen
https://www.wildebloemen.info/pages%20overig/resultkleur.php?color=geel&bloemvorm=alles&maand=6
https://www.kwekerijonline.nl/bosplantsoen
https://www.vechtweelde.nl/plantengids/plant/sambucus/sambucus-canadensis-maxima
https://www.verspreidingsatlas.nl/mobiel/soortbeschrijving.aspx?soortnummer=5139
https://www.verspreidingsatlas.nl/
https://mens-en-gezondheid.infonu.nl/natuurgeneeswijze/
https://www.wintergek.nl/data/lijst-gemiddelde-temperatuur-nederland
https://nl.qwe.wiki/wiki/Hardiness_zone
https://moestuinwijf.wordpress.com/2016/04/18/voorjaarskruiden-en-groenten-en-het-maken-van-pesto/
· Angelica Engelwortel
· Anise Hyssop Anijs hyssop, ook dropplant genoemd
· Bachelors Buttons Centaurea cyanus, cornflower Korenbloem,
Dried cornflower as used in herbal tea & tea blends
· Bee Balm horsemint, oswego tea Bergamot, Monarda
· Begonia
· Borage
· Black Locust (tree) Robinia pseudoacacia acacia,witte acaciaofvalse acacia
· Calendula Goudsbloem
· Carnations Dianthus caryophyllus, clove pink Anjers
· Chamomile Kamille
· Chickory Wilde cichorei of wegenwachter (Cichorium intybus)
· Chives (and other alliums) Bieslook
· Chrysanthemum chrysant
· Clover Klaver
· Daisy madeliefje
· Dame’s Rocket Hesperis matronalis Damastbloem
· Dandelions Taraxacum Paardenbloem
· Daylilies (Hemerocallis fulva) Daglelies
· Elderflower Vlierbloesem
· Fireweed Wilgenroosje
· Forsythia Chinees klokje
· Fruit Blossoms (Apple, pear, plum, citrus, etc)
· Hibiscus
· Hollyhock (Alcea rosea) Alcea (Stokroos)
· Honeysuckle
· Hostas
· Lavender
· Lilac
· Linden
· Marshmallow
· Meadowsweet
· Milkweed
· Nasturtium
· Peonies
· Phlox
· Rose
· Scented Geraniums
· Sunflowers
· Tulips
· Violets
Keep in mind though that these can be toxic to dogs.
Sources:
laidbackgardener.blog/2016/10/10/how-tulips-helped-save-holland-from-starvation/
/www.motherearthnews.com/organic-gardening/how-to-sustainably-harvest-daylilies-zbcz1307
https://latterrain333.wixsite.com/mysite
Alfalfa
Source:
https://www.youtube.com/channel/UC5BpcDICcOLVFVmVNLRXM8w/videos
https://www.ediblewildfood.com/
https://www.gydovanderwal.nl/wildplukwandelingen/
https://dailygreenspiration.nl/wildplukwandelingen-nederland/
https://www.tanjahilgers.nl/agenda/
https://www.hofvandelfland.nl/eetbare-wilde-planten-het-kralingse-bos
Here are the plants: (april)
- Tulips - Tulipa spp.
- Wild field mustard flowers - Brassica rapa
- Apple flower petals - Malus spp.
- Purple deadnettle - Lamium purpureum
- Hop shoots - Humulus lupulus
- Hedge mustard - Sisymbrium officinale
- Arugula - Eruca sativa
- American Elm seeds and leaves - Ulmus americana
- Wild Lettuce - Lactuca serriola
- Lemon Balm - Melissa officinalis
- Hawthorn tree leaves - Crataegus spp.
- Bittercress - Cardamine hirsuta
- Nipplewort - Lapsana communis
- Dandelion leaves and flowers - Taraxacum officinale
- Tamarack needles - Larix laricina
- Chickweed - Stellaria media
- Cat's-ear - Hypochaeris radicata
- English Daisy - Bellis perennis
Source:
The plants in order of appearance: (June)
1. Common sowthistle - Sonchus oleraceus
2. Grand fir - Abies grandis
3. Spearmint - Mentha spicata
4. Wild field mustard - Brassica rapa
5. Wild garlic - Allium vineale
6. Chickweed - Stellaria media
7. Black locust - Robinia pseudoacacia
8. Sheep sorrel - Rumex acetosella
9. Blue Spruce - Picea pungens
10. Trailing blackberry - Rubus ursinis
11. Nipplewort - Lapsana communis
12. Cleavers - Galium aparine
13. Oregon grape - Mahonia aquifolium
14. Western Larch - Larix occidentalis
15. Dandelion - Taraxacum officinale
16. Common hawthorn - Crateagus monogyna
17. English daisy - Bellis perennis
18. Hedge mustard - Sisymbrium officinale
19. Curly dock - Rumex crispus
20. Bristly hawksbeard - Crepis setosa
21. Lemon balm - Melissa officinalis
22. White clover - Trifolium repens
23. American elm - Ulmus americana
24. Bittercress - Cardamine hirsuta
Here are some tips for making a great wild salad:
1. Focus on plants that are in good condition.
2. Pick clean. Look through what you pick, as you are picking it. leave the grass, pieces of other plants, and poor-quality plant parts out in the field.
3. Pick organized - and keep everything organized until you've double-checked it all, back in the kitchen
4. Chop the plants into tiny pieces
5. Keep some of the wild flowers aside, to mix into the chopped greens. It all looks nicer that way.
6. Use a simple salad dressing. Let the taste of all those wild plants shine. A simple oil and vinegar mix works fine!
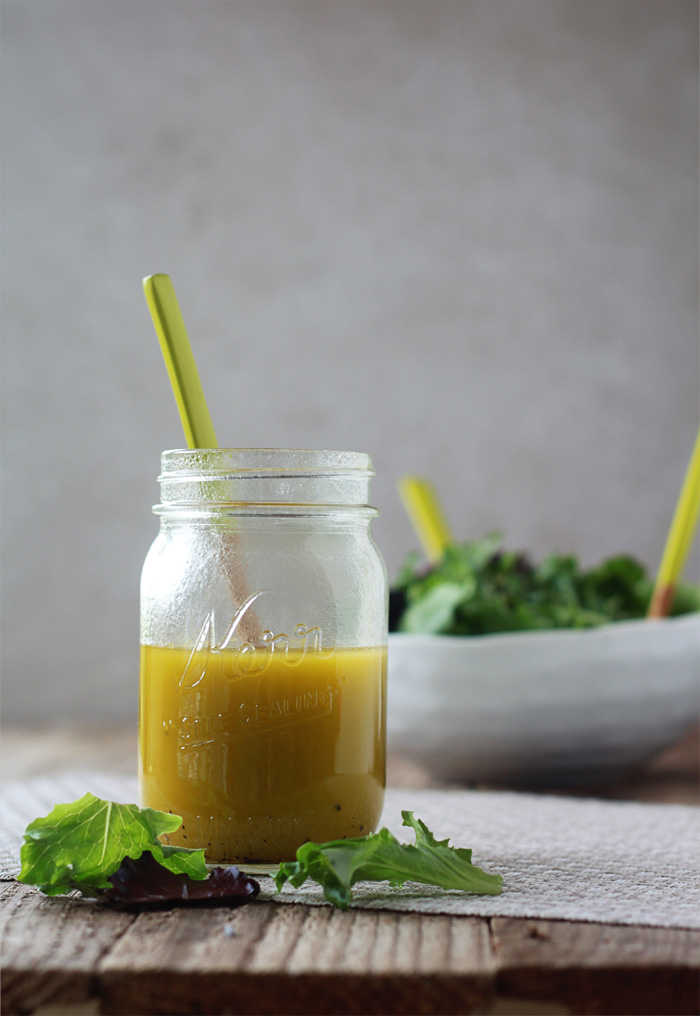
THE MAGICAL VINAIGRETTE FORMULA
1 part vinegar to 3 parts oil
+ salt and pepper to taste
If you enjoy foraging wild plants, here's my playlist - Foraging: Real Food for Regular People
If you want to eat what you forage, here are playlists about preparing your harvests:
Cooking Wild Greens - https://www.youtube.com/playlist?list...
Wild Salads - https://www.youtube.com/playlist?list...
If you like to garden, too, here are my gardening playlists:
Potatoes - An easy and productive garden crop - https://www.youtube.com/playlist?list...
Elephant Garlic: How to get the most out of growing
Elephant Garlic - https://www.youtube.com/playlist?list...
Collards: How To Grow and Use ALL of Your
Collard Plants - https://www.youtube.com/playlist?list...
Hops: How To Grow and Use ALL of Your Hop Plants - https://www.youtube.com/playlist?list...
In the Garden - https://www.youtube.com/playlist?list...
Here are my playlists about specific wild plants:
Dandelions - https://www.youtube.com/playlist?list...
Wild Mustard Plants - https://www.youtube.com/playlist?list...
Elderberry - https://www.youtube.com/playlist?list...
Spruce Trees - https://www.youtube.com/playlist?list...
Redbud Trees - https://www.youtube.com/playlist?list...
Detailed ID of Wild Mushrooms - https://www.youtube.com/playlist?list...
My channel: Haphazard Homestead: https://www.youtube.com/channel/UCcZC...
Source:
https://www.youtube.com/user/HChrisH200

HOW TO MAKE A SIMPLE VINAIGRETTE SALAD DRESSING
BY KARE
I’ve always loved a good green salad. The thing is, I just cannot find a store-bought salad dressing that I like. Most of them taste cloying and weird to me. But you know what? That’s okay.
Why? Because it’s super, duper easy to make my own homemade oil and vinegar dressing. And way less expensive. And I know exactly what goes into it!
Vinaigrette, a dressing made with oil and vinegar, is my favorite – and arguably the easiest to whip together, too. We’re talking 30 seconds or so. Less time than it takes to shop for a bottle of the stuff at the store!
So as I was shaking together my umpteenth jar of vinaigrette, I thought, hey! I should write a new tutorial! And so here it is:
HOW TO MAKE A SIMPLE VINAIGRETTE SALAD DRESSING!
The main thing?
KNOW THE FORMULA
Once you know the formula for homemade vinaigrette, you’re set!
THE MAGICAL VINAIGRETTE FORMULA
1 part vinegar to 3 parts oil
+ salt and pepper to taste
Wasn’t that easy?!
You’re done!
Okay, well, here’s a little more …
CHOOSE YOUR INGREDIENTS
I’ve always loved a good green salad. The thing is, I just cannot find a store-bought salad dressing that I like. Most of them taste cloying and weird to me. But you know what? That’s okay.
Why? Because it’s super, duper easy to make my own homemade oil and vinegar dressing. And way less expensive. And I know exactly what goes into it!
OIL
You can go with extra virgin olive oil, which I use 95% of the time. Or choose a light, flavorless oil like grapeseed oil, canola oil, or vegetable oil. For some extra flavor, you can even swap in a touch of nut oil like walnut oil or hazelnut oil; or a bit of sesame oil adds a delicious Asian vibe. Just use a light touch with the more strongly flavored oils.
It goes without saying that higher quality oil is going to taste the best. But personally, as you can see by the photo, I’m not opposed to a little Costco generic brand love. Tastes pretty great to me!
VINEGAR
Ahhh, so many lovely varieties of vinegar. Most wine vinegars will yield a lighter vinaigrette. Rice vinegar is also a nice, light choice. Apple cider vinegar lends a nice little bite (I like using it in salads with apple). Balsamic vinegar is a bolder choice, but lends a wonderful sweet/tart flavor to the mix. Sherry vinegar is also nice, but can be bold, so tread lightly.
Lemon juice is often substituted for vinegar, but I prefer to supplement the vinegar with acidy citrus juices (orange and lime juices also fall into this category) rather than replace the vinegar entirely. Generally I’ll swap out half the vinegar for citrus juice if I’m going that route.
ADD-INS/SEASONINGS
As I referenced in the formula above, aside from oil and vinegar, the only other thing you really need for a superb and super-simple vinaigrette is a bit of salt (I like kosher salt or sea salt) and pepper (I prefer freshly ground black pepper).
But it’s fun to do more, if you want! Here are some ideas for deliciously aromatic add-ins:
- Fresh chopped herbs like dill, basil, parsley, cilantro, mint, or thyme (dried herbs work, too)
- Finely minced garlic or fresh ginger
- Shallots, scallions, or onion
- Bold cheeses – finely grated or crumbled – such as Parmesan, Pecorino Romano, Gorgonzola, or feta
- Crushed red pepper flakes, a bit of horseradish, or even a bit of Sriracha add a bit of heat
- Dijon mustard adds flavor and acts as an emulsifier – it’s kind of vinaigrette’s best pal. More about emulsifying in a minute.
- Sugar or honey helps mellow the vinegar’s acidity, if necessary, plus, honey works as an emulsifier, too.
MIX IT!
Yes, oil and vinegar likes to stay separated. But for vinaigrette, we want it together – at least long enough to get it onto our salad.
One effective way of mixing it together (also known as “emulsifying”) is to use a blender. But I feel like that over-complicates the process and, let’s be honest, I don’t like the extra clean-up. And this is all about simple!
So I almost always mix my vinaigrette one of two ways:
WHISK IT IN A BOWL
Add all of the ingredients to a small bowl and briskly whisk until all of the ingredients come together. That’s it! You can also add all of the ingredients except the oil, then whisk while adding the oil in a stream, which can help with the emulsification.
A tip Brandy shared has been a bit life-changing, too: just whisk the vinaigrette right in the salad bowl, add the greens, and toss. It only works if you’ve got just the right quantity for your salad, but it’s still an incredibly convenient option when the stars align.
SHAKE IT IN A MASON JAR
This is my favorite method because it’s easier (read: lazier). Just add all of the ingredients to a mason jar, screw on the lid, shake for a few seconds, and: voila, vinaigrette!
Bonus: you’ve now got a ready-made container for storing leftover dressing in the fridge for later on!
TASTE, ADJUST SEASONINGS, AND SERVE
Once it’s mixed, just taste and adjust the seasonings if you like, and you’re good to go. Tasting tip: For the most accurate idea of what the dressing will taste like on your salad, dip a leaf into the dressing, shake off the excess, and try.
If you’re not serving your vinaigrette right away, you may have to shake it again right before serving. But here’s where the bonus of a couple of the add-ins come into play: both Dijon mustard and honey help emulsify the dressing, which keeps it together longer. So consider adding one or both of these if you’re entertaining and don’t want the embarrassment of a broken-down dressing (the horror!) or if you are just plain tired of shaking.
And … that’s it!
YIELD: APPROX. 1/4 CUP
HOW TO MAKE A SIMPLE VINAIGRETTE SALAD DRESSING
PREP: 2 MINUTES
TOTAL: 2 MINUTES
Got two minutes? Along with oil, vinegar, salt, and pepper, that’s all you need to make a simple vinaigrette at home. Trust me, it’ll beat the pants off of store-bought! This basic vinaigrette recipe yields enough vinaigrette to lightly dress a salad for four.
INGREDIENTS:
- 3 tablespoons extra virgin olive oil (or a more neutral-flavored oil like grapeseed, canola, or vegetable)
- 1 tablespoon white wine vinegar (or balsamic, apple cider vinegar, rice, sherry, or other wine vinegar)
- Pinch of kosher salt
- A turn of freshly ground black pepper
OPTIONAL ADD-INS:
- 1-2 tablespoons fresh chopped herbs like dill, basil, parsley, cilantro, mint, or thyme (dried herbs work, too, just use 1-2 teaspoons instead)
- A finely minced garlic clove
- 2 teaspoons finely minced or grated ginger
- 2 teaspoons finely chopped shallots, scallions, or onion
- 2 tablespoons finely grated or crumbled Parmesan, Pecorino Romano, Gorgonzola, or feta
- Pinch of crushed red pepper flakes, 1 tablespoon horseradish, or 1/4 teaspoon Sriracha
- 1 teaspoon Dijon mustard
- 1/2 – 1 teaspoon sugar or honey
DIRECTIONS:
- Add all of the ingredients to a small mason jar, screw on the lid, and shake until blended. You can also whisk the ingredients together in a bowl or whirr them together in a blender.
- Taste and adjust seasonings if desired. Add to salad, toss, and serve.
- Keep leftover dressing in a sealed jar in the refrigerator for 2 – 3 days.
NUTRITION INFORMATION
Yield: Approx. 1/4 cup, Serving Size: 2 tablespoons (1/2 recipe)
-
- Amount Per Serving:
-
- Calories: 180 Calories
-
- Total Fat: 20g
-
- Saturated Fat: 3g
- Sodium: 237mg
Source:
https://www.kitchentreaty.com/how-to-make-a-simple-vinaigrette-salad-dressing/
5 Tips How to Grow a Ton of Turmeric
in Just 3 Square Feet Garden Bed
Source:
5 Tips How to Grow a Ton of Ginger
in One Container or Garden Bed


Yarrow Tea
(Duizendblad)
The Herbal Bandage
Yarrow tea is an herbal tea that has long been associated with its ability to treat cuts and wounds.
For centuries people have resorted to this European herb to treat inflammation and disinfect scraped skin.
There are so many more benefits that you can get from this herbal infusion hopefully you will soon add it to your pantry.
So come and let’s take a look at this healing tea!
What is Yarrow?
Yarrow, achillea millefolium in Latin, is a hardy perennial plant native to the temperate regions of Europe and Asia and has since spread to other continents such as North America and Australia and so today it can be found worldwide.
The scientific name Achillea comes from the name of Achilles the Greek hero who used this herb to heal himself and his soldiers, and Millefolium is a reference to the multitude of fine feathery leaves that characterize this plant.
Its many historical uses have spawned throughout the ages a variety of other common names such as: nosebleed, woundwort, old man's pepper, thousand-leaf, carpenter's weed, herba militaris or soldiers wound wort. Names either refer to the lovely leaf structure or to the blood-staunching properties of yarrow.
Yarrow is a tall, but slender, plant that reaches up to a 1 meter in height.
It is often compared to a weed as it grows in waste areas, the sides of roads, along fences, lawns, edges of train tracks, filling the air with a chrysanthemum-like aroma.
It has several long, thin green stems from which grow fine green leaves that are fern-like, feathery and highly segmented from as small as 5cm long to as big as 20cm long.
It is the appearance of the leaves that give the plant its scientific name.
Typically yarrow blooms from May to September, or sometimes as late as November, producing clusters of tiny white, pink, red or violet disk-shaped flowers.
Each cluster may have as many as 15 to 40 little flowers arranged in a flat-topped display.
Its beautiful flowers make it a wonderful ornamental plant in many gardens. It can be used both to help enrich soils as well as a landscaping feature, preventing soil erosion.
History of Yarrow
Yarrow has been found to have a long history dating back to the Neanderthals, over 60,000 years ago. Our ancestors used yarrow as a medicinal herb to treat minor wounds, stop bleeding and inflammation.
Over 3000 years ago the ancient Greeks used this herb to treat wounds and fight fevers while promoting circulation. As stated above, this herb is associated with the Greek hero Achilles, who would treat his wounds as well as his soldiers' using yarrow leaves and flowers. The leaves would also be ingested in a tea to stop fevers or digestive issues.
For centuries the Chinese also used yarrow in their rituals, having recognized its healing potential for the body's main organs. They claimed that this herbal tea had the potential to enhance the mind, energize the body and brighten the eyes.
By the Middle Ages, yarrow was very much a part of European medicinal culture, being part of folk customs for protection and incantations in Britain as well as flavoring beer before the use of hops.
Early European colonists took yarrow to America where it was soon naturalized and became an important part in the traditional medicine of the Native Americans, treating wounds, infections and stopping bleeding. Different tribes would use it for earaches, as a sedative or to treat a cold or break a fever.
By the 17th century, this herb had become popular as an edible vegetable to be used in cooking soups or stews or as herbal tea to provide health benefits. It never stopped being used for its wound-treating abilities. It is believed that it was used during the American Civil War to help treat wounded soldiers.
Today yarrow is still planted both for medicinal uses as well as for its gardening value. Many people still like to use this herb in cooking, either a vegetable like spinach in a salad or soup, or as a herb to replace fresh or dried tarragon in recipes. It can be placed in oils and vinegar to add a touch of flavor.
Yarrow has found its way into the cosmetic industry, serving as an ingredient in cleansers and shampoos. Flowers and leaves also serve to add flavor to soft drinks, liquors and bitters.
People have not stopped using this herb medicinally, still brewing it into a tea for its many health benefits.
Yarrow Tea Benefits
Yarrow contains a variety of components that allow you to make a rich and nourishing cup of tea. It contains vitamins A, B-complex, C and E, bioflavonoids, choline, iron, magnesium, phosphorus, potassium, selenium, silicon, sodium, amino acids, bitters, flavonoids, terpenes, and tannins among many others.
Together with other phytochemicals, yarrow tea may provide with some of the following benefits.
Flu and Cold Remedy
-
- Yarrow tea is great when the first symptoms of a cold or the flu set in. It may help clear up mucous and relieve congestion, allowing to breathe better. This herb is said to help fight the infection that causing you to be ill. It may also soothe a sore throat and strengthen your lungs.
-
- Drinking this tea when you have a high fever will help to promote natural sweating and thus could break your fever in a safer and healthier way. Sweating is a way that the body has of expelling the microbes and bacteria. So have a hot cup of tea and stay under a warm blanket.
-
- A cup of this herbal tea is also said to help when you are suffering from allergies or hay fever. It may dry up your nasal passageways, which can be quite a relief when you have been sneezing all day because of dust or pollen.
- Its calming and antispasmodic nature may also bring some calm and relief if you suffer from asthma. Yarrow tea may help to reduce the severity of your attacks.
Digestive Tea
-
- Have a cup of yarrow tea if you are prone to indigestion or heartburn, as this tea promotes bile production that stimulates digestion, preventing food from staying in your stomach too long and causing pain. It is the bitter components of this tea that are said to get your stomach to work better and faster.
-
- At the same time, this tea may improve your digestive health by protecting the lining of the stomach from infection and inflammation and soothing stomach muscle spasms that could lead to painful cramps. This tea may offer relief from a stomach flu, nausea, vomiting and even gastritis.
-
- By stimulating the production of digestive juices and bile, you are also helping to prevent the formation of gallstones and so keeping your gallbladder happy and healthy.
-
- Drinking yarrow tea may also protect and boost the health of your intestines. It is said that it helps to soothe bloating and flatulence as well as possibly treat colic and diarrhea. It may help to coat the inner lining of your intestines thus also preventing inflammation and cramping.
-
- Talk to your doctor about using this herbal tea as a possible remedy for colitis or diverticulitis. More serious and chronic digestive conditions should be followed up with a doctor, so that proper testing can be done.
- As you use this herbal tea to improve your digestive health expect to feel an increase in appetite, so make sure to eat healthy so as not to hinder the healing process and gain excessive weight in the process.
Heart and Blood Tonic
-
- One of the most popular benefits of yarrow tea is its ability to stop bleeding, internally and externally. It said to help stop internal bleeding. Of course, any such situations, either in the lungs or digestive tract, should be followed up with a doctor in order to discard the possibility of a more serious problem.
-
- Drinking this tea is said to improve blood flow, by purifying the blood of toxins and bacteria as well as boosting circulation where there are possible situations of stagnation. Poor circulation can be felt when you have cold hands or feet and this tea may help you with that.
-
- Yarrow tea may also serve as a heart tonic, by not only toning, but also strengthening and dilating your blood vessels. As a result this tea may help to regulate your blood pressure and reduce the risk of blood clots that could cause serious heart complications. This could also help with varicose veins.
- If you are taking any form of heart medication or blood thinners, make sure to talk to your doctor first, as this tea may dangerously alter the effects of your medication.
Liver Tonic
-
- Yarrow herbal tea may also tone your liver, stimulating its activity and providing balance when you need it. The chemical components of yarrow are said to actually protect the liver and get rid of any elements that may cause harm to it.
- This tea serves to detoxify the liver, helping to keep hormonal production in check and allowing you to deal with issues like depression better. Find out how it can also help with anxiety and stress next.
Sedative Tea
-
- Yarrow tea is known for analgesic and calming properties. It is said to soothe pain and allow you to recover from illness or simply relax better by toning down tension and cramps.
-
- If you are feeling fatigued, but have a hard time falling asleep, you may consider drinking a cup of this herbal tea as it is said to relax the mind and the body. Sometimes all you need is just something to nudge you off to sleep. It may treat insomnia and protect your mind from exhaustion.
-
- A cup of yarrow tea may serve as sedative in case of mild anxiety. If you feel stressed or tense, then consider drinking a cup of this tea. This nerve tonic could help lift your spirits as well as calm the mind enough to let you see more clearly what the source of your anxiety is.
- Sometimes we all need a little help dealing with the complicated situations of our daily lives. Yarrow tea could be a healthy companion that allows you to cope with the tension of everyday life. It should not be taken in place of other similar prescription medications, but you can talk to your doctor about it.
Immunity Booster
-
- Drinking this tea can help boost your immune system defenses. Yarrow is said to be anti-inflammatory, helping to expel from your body toxins that could be causing your harm. You have already read how this tea can help your respiratory and digestive systems, but there are so many more ways this tea can help.
- This ability could turn yarrow into a great infusion to help if you suffer from stiff joints and rheumatism. It said that this tea could flush out the inflammation as well as boost circulation to the affected areas, helping to soothe the pain and let you move about better.
Tea for Urinary Infections
-
- Drinking yarrow tea could increase urine production; this is because this tea is a diuretic that may help to flush out excessive fluids. For some, this could be a way of dealing with water retention.
-
- Taking this tea could help clear out bladder or kidney infections. It could be a good way to help calm an irritated bladder and treat a minor ailment. Keep sure to monitor your condition, as more serious ailments require more extensive exams that should be done by your doctor.
- It is said that clearing out your urinary system of harmful agents and calming the smooth muscles that support could help deal with night incontinence. While yarrow may increase your urge to urinate, it could also deal with what is causing your continence. Consult with your doctor for more advice on your situation.
Tea for Women
-
- Yarrow tea serves as a tonic for women. It is said to be helpful to regulate menstruation, stimulating it when it is absent or delayed, reducing heavy bleeding when these occur. If heavy bleeding continues, this is something to look into with your gynecologist.
-
- This tea may stimulate the uterus in a way that will help to better regulate your cycles, toning the uterus and easing painful menstruation, cramps and uterine congestion. Drinking yarrow tea could help also prevent uterine fibrosis and endometriosis.
-
- By also toning your liver and balancing your hormonal production, this tea could help ease PMS symptoms and down the road, it could help you to deal with symptoms of menopause.
- Yarrow tea also has a reputation of helping to cleanse the uterus after a miscarriage and stopping excessive bleeding after a birth. However, you should never attempt to do this on your own as what works for some women but not necessarily for every woman and could be quite dangerous. Seek your doctor’s advice on this.
External Benefits
-
- The ability to treat wounds and cuts is one of the best known benefits of this tea. It is certainly one of the reasons that this herb has been venerated for ages. So let your yarrow tea cool down and then apply it to your skin using a clean cotton ball.
-
- This cool infusion could be useful to clean wounds, stop bleeding cuts, numb the pain, and speed up scarring of skin tissues and soothe burns. Its calming and cleansing action may help with rashes and itchy sensation.
-
- Yarrow can be used to make an antiseptic infusion to help skin infections from spreading or just to appease existing skin conditions such as psoriasis or eczema. This herbal tea may even aid in clearing up acne.
-
- Just as drinking this tea may help with internal inflammations, applying it topically may help with external ones, so apply it to your stiff joints when needed to help with arthritis or rheumatism. You may also use it in compresses to help treat varicose veins.
-
- Although there is no fountain of youth, you may wish to try applying yarrow tea to you skin. It is said that this herbal infusion may help clear up your skin, keeping it fresh and possibly delaying premature aging.
- Apply the cooled infusion to your hair as a tonic to fight hair loss. It is said to help prevent baldness. It is best suited for dark-haired people, removing toxins from the scalp and sorting oily hair out.
Begin healing now!
Source:
https://www.therighttea.com/yarrow-tea.html

Sauteed Goatsbeard Recipe
Ingredients
>> 10 to 15 thin goat’s beard stems (with flowers and leaves)
>> 1 onion sliced thin
>> butter or oil to sauté
Instructions
Sauté all ingredients over low heat in either butter or oil of your choice until onions are clear and the goat’s beard has become soft.
Serve immediately.
Wild Edibles in Recipe: Goat's Beard
Tragopogon pratensis
Gele morgenster
Identifying Maple & Birch trees
for sap & syrup production
Februari and March:
Sugar maple tree
40 gallon of sap - 1 gallon of syrup
Guidelines to follow:
- Only tap trees over 12"in diameter.
- Only trees over 18"in diameter should recieve more than one tap.
- Smaller spouts are pregerable over larger spouts.
Red Maple (Acer Rubrum) (half the sugar concentration then the sugar maple tree)
Birch (Betula)
Yellow birch tree (Betula Alleghaniensis)
Black birch tree (Betula Lenta)
80 gallon of sap - 1 gallon of syrup
sesame and wilted green salad

Sesame and Wilted Green Saute Recipe
A quick saute that is a powerhouse of nutrients.
Ingredients
>> 2 cloves of garlic, peeled and finely chopped
>> 2tbsp. sesame oil
>> 2 litres (8 cups) wild greens (possibilities: plantain, dandelion, lamb’s quarters, mustard)
>> 1 tbsp. tamari or soy sauce
>> 2 tbsp. orange juice
>> 2tbsp. toasted almonds
>> toasted sesame seeds for garnish
Instructions
In a heated skillet, sauté your choice of wild greens for two minutes with sesame oil. Add tamari (or soy sauce), orange juice and toasted almonds. Blend well.
Remove from heat. Sprinkle toasted sesame seeds on top as a garnish and serve.
Wild Edibles in Recipe: Broadleaf Plantain, Dandelion, Garlic Mustard, Lamb's Quarters
Source:
https://www.ediblewildfood.com/sesame-and-wilted-green-saute.aspx
https://en.wikipedia.org/wiki/Liquorice
https://stadstuinieren.nl/inspiratie/groene-geheimen-zoethout/
Zoethout Glycyrrhiza Glabra
https://www.onszaden.nl/glycyrrhiza_glabra
PINDAPLANT
ook wel genoemd: AARDNOOT (Engels: Peanut or Groundnut)
(Arachis hypogaea)
PRUNUS DULCIS - HALFSTAM
https://www.tuinplantenwinkel.nl/prunus-dulcis-halfstam.html
KONINKLIJK BESLUIT van 29 AUGUSTUS 1997
betreffende de fabricage van en de handel in voedingsmiddelen die uit planten of uit
plantenbereidingen samengesteld zijn of deze bevatten
(Stbl. 21.XI.1997)
Source:
https://www.zoelho.com/ZoelhoNL/Publish/KB_29_08_97_PLANTEN.PDF
Chinese yam
Dioscorea polystachya/alata (purple)
Source:
https://www.vreeken.nl/409520-yam-chinese
SNEEUWBANAAN
ENSETE glaucum
https://www.vreeken.nl/643340-ensete-glaucum

Moringa tree / Peperwortelboom


Peperwortelboom
De peperwortelboom[1] (Moringa oleifera) is een boom uit de familie Moringaceae. De soort komt vooral voor in tropische en subtropische gebieden met een steppeklimaat.
Moringa oleifera staat ook wel bekend als de 'wonderboom' vanwege de hoge voedingswaarde en medicinale eigenschappen van de bladeren en vruchten van de boom.[2] Zo worden de bladeren in Zuid-Afrika gebruikt om ondervoeding tegen te gaan. Door deze eigenschappen wordt Moringa oleifera op grote schaal gekweekt in plantages.
Achtergrond
Moringa oleifera groeit het beste op droge zandgrond. De boom is goed bestand tegen droogte en groeit relatief snel.
De plant komt van oorsprong voor in de heuvels aan de zuidelijke kant van de Himalaya in Noordwest-India, maar wordt inmiddels ook gekweekt op plantages in Afrika, India, Indonesië, Maleisië, Mexico, de Filipijnen, Midden- en Zuid-Amerika en Sri Lanka.
De soort wordt doorgaans gezien als de bruikbaarste boom ter wereld, omdat bijna elk onderdeel van de boom kan worden gebruikt als voedsel of voor andere nuttige doeleinden.
Voedingswaarde
De nog niet volgroeide, groene vruchten van de boom worden het meest gebruikt. In Zuid- en Zuidoost-Azië worden ze in veel gerechten verwerkt. De zaden uit de volgroeide vruchten kunnen worden gegeten als noten of erwten. Tevens kan uit de zaden 38 tot 40% plantaardige olie worden gewonnen, genaamd behenolie.
De bloemen van de boom zijn, indien gekookt, ook eetbaar. De wortel kan worden vermalen en gebruikt als condiment.
,lf,e-s_greenhouse_Radix_Serre@Wageningen_University,NL_fri24jun2011.jpg)
De bladeren van de boom zijn rijk aan onder andere bètacaroteen, vitamine C, proteïne, ijzer en kalium.[2] De bladeren kunnen worden gekookt als spinazie, of gedroogd en vermalen worden toegevoegd aan maaltijden.
Vanwege de sterke voedingswaarde van de boom, wordt Moringa oleifera op steeds grotere schaal ingezet voor de bestrijding van ondervoeding in ontwikkelingslanden. Onder andere Trees for Life, Church World Service, Educational Concerns for Hunger Organization, en Volunteer Partnerships for West Africa gebruiken de boom voor dit doel.
Andere eigenschappen
De zaden van Moringa oleifera kunnen worden gebruikt om water te zuiveren, daar ze in staat zijn tot 98 procent van onzuiverheden en micro-organismen uit water te halen.[2] De bladeren en vruchten kunnen worden verwerkt in medicijnen.
Externe link
Source:
Licht-en donkerkiemers
Elke groente of elk kruid moet op een andere manier worden gezaaid. Ze hebben specifieke eisen die erg van elkaar kunnen verschillen. De ene soort moet bedekt worden met een laagje aarde om te kiemen, de andere heeft licht of een korte periode van koude nodig om een teken van leven te geven. Wij sommen er enkele op:
- Lichtkiemers: soorten die je niet onder de grond stopt of bedekt met een laagje grond. De zaden moeten oppervlakkig over de grond worden verspreid. Kortom, de zaden hebben zonlicht nodig om te kiemen. Basilicum is er één van.
- Donkerkiemers: het meest voorkomend bij groente. Je stopt de zaden in de grond of bedekt ze met een laagje grond. Ze hebben geen zonlicht nodig om te kiemen.
- Koudekiemers: soorten die eerst een koude periode moeten hebben doorgemaakt vooraleer ze kiemen. Nieuw-Zeelandse spinazie is daar een voorbeeld van of – in de bloemenwereld – Protea, een Zuid-Afrikaanse bloem waarvan de zaden ook eerst een koude periode moeten hebben gehad.
Source:
Zaden envelop:
- - Geen zelf gefabriceerde papieren zakjes, er is gebleken dat deze snel kapot gaan in de post!
- - Belangrijk: Vermeld bij toegevoegde zaden soort, variant/ras en expiratiedatum/aankoopdatum/geoogste datum! Dit met oog op het verouderen van het zaad waardoor kiemkracht verloren gaat. Dit scheelt veel zaden die moeten worden weggegooid omdat kiemkrachtigheid niet te achterhalen is.
- - Er zijn zakjes alleen dit jaar nog houdbaar zijn, deze zaden zullen aan het eind van het seizoen worden weggegooid ivm de kiemkracht. Houd je dus vooral niet in om van deze zaden te nemen! Indien je zelf zaden hebt die dit jaar op moeten: zet dat er dan gerust op!
Source:

Gaat dat zaad nog kiemen? Zo kom je er achter
door Anne Marie van Dam | 28 mrt 2018
Zaadjes testen gaat zo…
Kiemende zaden houden van vocht en warmte. Daar zorg je dus voor. Neem een bakje, leg daar in een nogal vochtig dubbelgevouwen keukenpapier. Leg daarop je zaadjes. Daarop gaat nóg een dubbele laag vochtig keukenpapier. Dan gaat er een deksel op, zodat zaaisel en papier niet uitdrogen. Schrijf op waar welke zaadjes liggen. Bewaar bij kamertemperatuur.
Sommige zaden kiemen snel, bv koolsoorten, tuinkers en sla hebben er maar een paar dagen voor nodig. Andere soorten doen er 3 – 4 weken over. Van de meeste moestuingewassen weet je na één à twee weken wel of er nog wat gaat gebeuren.
Op de foto de uitslag van mijn kiemtest. De zonnebloemen en de bietjes gaan het doen. Van de ene bietensoort moet ik wat meer zaad gaan gebruiken, want daarvan kiemt maar een kwart. Afrikaantjes, huttentut, stokroos: die doen het nog. Een paar anderen niet.
Speciale wensen
Van de soorten die niet kiemen kun je opzoeken of ze nog speciale wensen hebben. Er zijn zaden die een kiemrust hebben, en pas een aantal maanden na oogst kunnen kiemen. En er zijn er die – vochtig en wel – eerst warm, dan winters koud, en dan weer een warm willen liggen. Daarvoor kijk ik meestal op de site van Vreeken Zaden. Als er een bijzondere behandeling nodig is, staat dat daar bij de soort beschreven.
Zo staat mijn Roomse Kervel-zaad al sinds de nazomer in een potje met zandgrond in de tuin. Als het nu ècht voorjaar wordt, zal het dan gaan kiemen?
Source:
Diana's moestuin
Bijzondere Kiemers
In dit gedeelte kun je wat lezen over bijzondere “kiemtechnieken”.
Graag wil ik daarbij nog wel even aangeven dat dit soort kiemtechnieken niet perse moeilijk zijn maar wel vaak meer aandacht en tijd vergen.
Op de foto rechts zie je gekiemde prei. Je moet het maar net even weten maar prei kiemt graag vroeg en zeker niet te warm (eerder behoorlijk koel), en ze wil ook graag in het donker kiemen (de zaden moeten dus goed met een laagje grond bedekt worden). Zelfs dan zie je nog dat bij het kiemen het lege zaadhulsje nog een tijdje op het hoofd geplakt zit. Als je het eraf zou halen kun je het zaailingetje beschadigen, uiteindelijk vallen die lege hoesjes er vanzelf wel vanaf, tijdens de groei van de zaailing en na een aantal regenbuien.
Uiteindelijk zouden planten die zich in de natuur via zaden zichzelf vermeerderen, dit nu ook moeten kunnen, zonder hulp. Daarom vind ik zelf dat het proberen nabootsen van de natuur bijna altijd de beste manier is om zaden te zaaien. En dat is meestal in de nawinter. Want in de natuur vallen zaden in de herfst en na overleving in de winter zullen de zaden in het vroege voorjaar bij het lengen van de dagen, het sterker worden van de zon en het opwarmen van de grond uiteindelijk een kiemzetje krijgen.
En dus zaai ik winterharde vaste planten graag begin januari onder glas voor; de nachten zijn dan nog koud, maar als de zon overdag schijnt kan het achter glas al wel zo’n 15-20 graden worden. Door de zaden af te dekken met vermiculiet of brekerzand bedek je de zaden wel maar laat het ook nog wel licht door. Zoals ook in de natuur in de loop van de herfst/winter gevallen zaden worden bedekt met een laagje overgewaaide grond.
Uiteraard is het een heel ander verhaal als je over varens, palmen, kuipplanten, niet winterharde éénjarigen, etc. praat. Die hebben vaak wel bijzondere kiemhulp nodig, want die kiemen ook niet gemakkelijk uit zichzelf in Nederland.
Houd je vooral ook niet al te vast aan een bepaalde methode, maar bedenk zelf wat de oplossing zou kunnen zijn wanneer zaden van een bepaald soort niet willen kiemen. Denk daarbij aan hoe het in de natuur zou kunnen gaan. Voorbeeld:
Mocht je zaden hebben gezaaid van bijvoorbeeld Belamcanda, en je hebt deze zaden binnen in potjes gezaaid en na een aantal weken zie je nog steeds geen kiemplantje opkomen. Zet haar dan eens een week of 2 buiten bij niet vriezend maar wel koud weer. Als je de potjes dan na 2 weken weer binnen haalt kan die overgang van koude naar warmte net een kiemzetje geven (alsof de zaden van de koude winter de warme lente ingaan).
Of mochten zaden niet kiemen, haal dan eens voorzichtig wat grond, zand of vermiculiet weg zodat de zaden iets meer licht krijgen, misschien helpt het wel.
Hoe dan ook, probeer altijd zo veel mogelijk te kijken naar hoe een plant in de natuur leeft en zich vermeerdert en zie dat als leidraad voor je eigen zaaimethode.
Nu hieronder wat beschrijvingen van verschillende technieken om zaden een “kiemzetje” te geven:
Essentiële benodigdheden voor de kieming:
Grond
Zorg dat je weet uit welke natuurlijke grondsoort een plantensoort die je wilt gaan zaaien komt. Bijvoorbeeld Mediterrane planten zaai je in goed doorlatende en redelijk arme grond (arm aan voedingsstoffen), bijvoorbeeld varens “zaai” je in zure (veen-)grond. Ik gebruik echter zelf voor 90% van alle zaaisels een mengsel van goede kwaliteit potgrond en/of cocopeat (potgrond die niet op basis is van turf maar op basis van kokosvezel) en dat vermengt met ongeveer 20% brekerzand (een grof zand). Afhankelijk van je mogelijkheden, wensen en ervaring kun je op een gegeven moment wel een soort mengsel maken waarmee je zelf goede ervaringen hebt.
Licht
Licht kan het ontkiemen van zaden bevorderen of belemmeren. Een algemene regel is dat grote zaden dieper moeten worden gezaaid dan kleine zaden: reken dat je een zaadje ongeveer 2 keer zijn eigen dikte in diepte zaait (dus een zaadje van 1 mm dik zaai je slechts 2 mm diep, etc.). Heel vaak zie en hoor ik van mensen verhalen over niet kiemende zaden waarbij al snel duidelijk wordt dat ze te diep hebben gezaaid; de zaden gaan dan, zeker in natte grond, snel rotten.
Eer zaden van slechts 2 millimeter groot een afstand van 2 centimeter in de grond hebben overbrugd, op zoek naar licht en lucht, is de kans groot dat de zaden ergens onderweg al sneuvelen – te ver weg. Een zaadje moet wel een beetje het idee hebben waar ze naar toe moet gaan kiemen – ze wil naar licht en warmte – dus zorg dat dat dichtbij genoeg is voor haar om te voelen dat ze daar naar toe moet).
Temperatuur
Veel soorten zaden hebben een brede temperatuurmarge voor het ontkiemen. Maar een aantal soorten hebben een vrij nauwkeurige temperatuur nodig om te kiemen. Liever iets te koud dan te warm: want gezaaide zaden kun je altijd wat warmer zetten als het te koud blijkt te zijn. Te warm kan ervoor zorgen dat de zaden in een soort tweede kiemrust raken, en dan moet je overnieuw gaan beginnen.
Uitzondering is de peper en paprika; die hebben flink wat warmte nodig om te kunnen kiemen. Bedenk dat onder de 18 graden de zaden niks doen, wachten op een temperatuur boven de 20 graden (en liefst heel ruim boven de 20 graden, van 26 of 27 graden schrikken de zaden ook niet echt). Voor pepers en paprika’s, en andere soorten planten (vaak tropische of subtropische soorten als palmen, Brugmansia’s, Cassia’s, etc.) kun je een elektrische propagator gebruiken (foto rechts), je kunt dan de temperatuur instellen en flink verhogen.
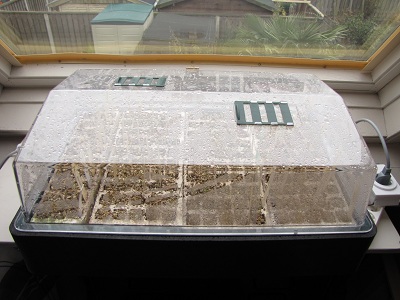
Door de kap die erop zit creëer je een hoge luchtvochtigheid in de propagator en de druk is in een propagator ook iets hoger. Zaden van tropische of subtropische planten kunnen in zo’n propagator beter, makkelijker en sneller kiemen.
Mocht je geen propagator hebben of willen (want ze zijn behoorlijk prijzig), denk dan eens aan plaatsen in je huis die altijd warm zijn voor dit soort zaaisels (bijvoorbeeld bovenop een modem, DVD-recorder, koelkast, verwarmingsketel, alle apparaten die altijd blijven draaien en dus altijd warmte afgeven).
Soms kun je denken dat het in de huiskamer voor het raam toch ook lekker warm is, maar bedenk eens hoe koud het zo dicht bij dat raam in een onverwarmde kamer in de nacht is. Het geeft een soort effect van overdag 1 stap vooruit, ’s nachts 2 stappen terug. Uiteindelijk kunnen zaden op die manier makkelijk ten prooi vallen aan schimmels, etc. Zorg vooral voor een zo constant mogelijke temperatuurhoogte (uitzonderingen daargelaten en er zijn uitzonderingen, let daar dus op en lees daarover verder naar beneden op deze pagina). Voor zaden die zo’n verzorging als een zo constant mogelijke temperatuur willen vind ik zelf de Deno-methode heel handig (waarbij je niet in grond zaait maar tussen een koffiefilter, doordat dat weinig plaats inneemt passen de zaaisels gemakkelijk op een klein warm apparaat als een computer of modem, recorder, etc.).
Water
Is van levensbelang in het eerste stadium van ontkieming. Het water dringt door de zaadhuid en laat het kiemwit zwellen zodat het zal splijten en de eerste voedingsstoffen door de kiem kan worden opgenomen. En dan begint dus de groei. Het moet vooral constant vochtig maar niet kletsnat zijn (uiteraard zijn er uitzonderingen). Een korte periode van droogte kan de dood betekenen voor de kiem.
Zuurstof
Het zaad moet kunnen ademen om voedsel tot zich te kunnen nemen. Het heeft dus lucht en licht nodig. Daarom verluchtig je potgrond altijd met wat grof zand, stamp je de grond niet te hard aan en geef je voldoende maar niet overvloedig water.
De kiemrust doorbreken
Bepaalde zaadtypen zijn wisselvallige kiemers. Zaad dat “vast zit” in de kiemrust kun je een kunstmatig zetje tot ontkieming geven, een soort voor de gek houden is het dus ( je bootst de lente na de winter na, of de erosie die in de winter op een zaadje plaatsvindt, etc.). De meest voorkomende manieren:
Scarificatie
Soms is de zaadhuid van een zaadje zo hard dat het wat menselijke spierkracht kan gebruiken. Gebruik een vijl of een stukje schuurpapier om een deel van de zaadhuid dunner te maken waardoor deze makkelijk vocht door kan laten.
En dat heeft dan tot gevolg dat de kiemrust wordt doorbroken en de kieming kan plaatsvinden. Vijl of schuur nooit aan de kant van het oog, of ook wel de navel genoemd (een kleine holte of tekening op het zaad). Dit om beschadiging van de kiem te voorkomen. En vijl nooit teveel weg, ook weer om beschadiging van de kiem te voorkomen.
In de natuur vindt dit proces van scarificatie ook plaats, maar dan op een natuurlijke manier; door weer en wind en het schuiven van harde materialen langs of over de zaden (opwaaiend zand, steentjes, het schuiven van de zaden over grond of steen, etc.). Vaak in combinatie met koude, regen, hagel, etc. Daarom worden bij zaden die dat nodig hebben, scarificatie en stratificatie vaak samen gebruikt, het is een soort verweren door weer en wind, en erosie.
Zelf nog nooit gedaan, maar wel eens ergens gelezen: een glazen pot vullen met grof zand en kiezels, en de zaden natuurlijk. Deksel erop en schudden. Deksel eraf, kiezels eruit nemen het zand samen met de zaden zaaien (of als de zaden groot genoeg zijn om te herkennen, deze eruit halen en zaaien).
En heel gemakkelijk is: 2 vellen schuurpapier nemen van gemiddelde korrel, zaden ertussen en (zachtjes!!!) wrijven tot je ziet dat de zaadhuid wat opgeschuurd is.
Soorten die scarificatie mogelijk nodig hebben of prettig vinden om te kiemen:
- Cassia
- Ipomoea
- Lupinus
- Lathyrus
- sommige palmsoorten
- Dictamnus
- etc.
Tot slot; zelf gebruik ik deze methode slechts zeer zelden. Heel vaak kiemen de zaden uiteindelijk toch wel, ook al duurt het kiemen dan een weekje langer. Ik vind het een beetje ‘tricky’ om aan zaden te gaan schuren. Zo af en toe moet het maar als het zonder deze methode kan, dan kies ik dat het liefst.
Stratificatie:
Het proces waarbij de kiemrust wordt doorbroken door een grote temperatuurswisseling toe te passen op het zaad. Soorten die deze temperatuurswisseling nodig hebben om te kiemen worden ook wel “koudekiemers” genoemd.
Het zijn vaak vaste planten uit koelere gebieden; in de natuur zullen ze pas kiemen wanneer de winter voorbij is. Het is dus een soort kiemuitstellend mechanisme met als doel het voorkomen dat pietepeuterige zaailingen te vroeg kiemen en in de winter doodvriezen (zaden tolereren vaak veel koudere temperaturen dan planten).
Het stratificeren heeft als doel die slapende toestand van de zaden te doorbreken. Eigenlijk boots je een winter na. Er zijn twee manieren om dat te doen:
Warme temperaturen die gevolgd worden wordt door koude temperaturen en dan weer warme temperaturen (je bootst de zomer, gevolgd door de winter en tot slot de lente na)
Koude temperaturen, gevolgd door warme temperaturen (je bootst de winter, gevolgd door de lente na)
Deze temperatuurswisselingen helpen bij het afbreken van de harde zaadhuid, zodat water binnen kan dringen en het kiemproces kan beginnen. En vaak worden de zaden nog extra geholpen door scarificatie, dus eerst de zaadhuid dunner maken en vervolgens een koudeperiode geven.
Natuurlijke stratificatie
In gebieden waar in een hele winter minimaal 3 weken lichte of matige vorst is, kun je deze methode toepassen. Zaai in het najaar in potjes met zaaigrond, druk zacht aan, dek de zaden af met scherp zand en geef wat water. Zet de tray of pot buiten, in regen, vorst, zon en sneeuw. De wisselende temperaturen zorgen voor het afbreken van de zaadhuid waarna de kieming kan plaatsvinden.
Zelf vind ik het begin januari zaaien van winterharde vaste planten in de onverwarmde kas of platte bak erg prettig; het is een manier van natuurlijke stratificatie, maar dan wat meer gecontroleerd. Door het glas worden de gezaaide zaden wat meer beschermd tegen overvloedige regen, hagel, etc. Terwijl het ook gewoon onder koud glas vriest, even hard als buiten. Maar door de vaak warmere dagtemperaturen is de kans op het bevriezen van de grond dan weer gering. En als de zon schijnt in januari, kan het onder glas al snel 15 tot 20 graden warm worden, zelfs al is het buiten rond het vriespunt. Dus de extremen (hoogst en laagst gemeten temperatuur per dag) ligt meestal verder uit elkaar. Absoluut niet wetenschappelijk onderbouwd, maar ik doe dit zo al jaren en heb er zelf erg goede ervaringen mee.
En daar gaat het ook vaak om; wat is je eigen ervaring, wat vind je zelf prettig, wat zijn je mogelijkheden (heb je een plaatsje voor een platte bak of heb je een kasje), etc.
Tot slot: uiteindelijk is het altijd handig om te bedenken hoe zaden in de natuur overleven en kiemen (bijvoorbeeld Eschscholzia en Papaver kiemen na de winter, Alcea rosea kiemt in het najaar en gaat al als jong plantje de winter in). En als je daarover nadenkt, kan dat je nog wel eens helpen de oplossing te vinden wanneer een bepaalde soort niet wil kiemen.
Kunstmatige stratificatie
In gebieden met milde winters kun je kunstmatig een winter nabootsen. Dit kan heel simpel door de zaden een paar weken in de koelkast te leggen. De tijd is zeer afhankelijk van de soort, sommige zaden hebben voldoende aan 3-4 weken bij temperaturen van 0-5 graden, sommige soorten hebben wel een koudeperiode van 10-20 weken nodig.
Meng het zaad met zand en potgrond en maak het vochtig maar niet kletsnat. Doe dit mengsel in een doorzichtige plastic zak en leg dit 4-8 weken in de koelkast. Kijk af en toe of je al een kiemwortel ziet. En als je een aantal kiemworteltjes ziet kun je heel voorzichtig de plastic zak openmaken, wat aarde en de zaden met kiemwortels eruit nemen en dit in een potje met potgrond en zand doen en verder bij hogere temperaturen opkweken.
Niet mijn favoriet omdat het lastig is om de kiem met mini-kiemworteltje over te planten en snel beschadigt, maar als je niet over een kas of platte bak beschikt en het moeilijk/risicovol vindt om buiten te zaaien in de winter, de moeite waard om te proberen.
Voorbeelden van soorten die stratificatie vragen (en zelfs eisen! – zonder stratificatie zullen ze niet kiemen);
- Astrantia
- Viola (maar niet alle Violasoorten, en dat geldt ook voor onderstaande planten)
- Delphinium
- Dictamnus
- Echinacea
- Campanula
- Impatiens balfourii
- Lupinus
- Clematis
- Polygonum oriëntale (foto bovenaan)
- etc.
Ik ben nog bezig een lijst te maken met soorten die echt bijzondere technieken nodig hebben om te kiemen, dus een lijst van koudekiemers, een lijst van donkerkiemers, etc. Die lijst volgt via deze pagina hopelijk binnenkort.
Licht / donker
Lichtkiemers
Zoals al eerder gezegd heeft de hoeveelheid licht invloed op het kiemen van een zaadje.
Licht, in combinatie met een stijgende temperatuur zorgt voor de kieming. En dat betekent bij sommige soorten dat de zaden niet bedekt mogen worden met aarde, omdat deze soorten alle licht die we die zaden kunnen bieden nodig hebben om te kiemen.
Voor deze zogenaamde lichtkiemers vind ik het zelf een prettige manier om op de zaaigrond wat grof zand (brekerzand) te leggen en daarop de zaden te leggen. En vervolgens met een plantenspuit (je kunt daarvoor ook een lege en goed schoongemaakte flacon glassex of iets dergelijks gebruiken), met een fijne broes de zaden/zand water te geven en de zaden zo iets in het zand te spoelen. Lichtkiemers zijn zeer gevoelig voor uitdrogen en hebben vaak meerdere keren per dag zo’n kleine “sproeibeurt” nodig.
Donkerkiemers
Eigenlijk zijn alle zaden donkerkiemers, behalve de (veel kleinere groep) lichtkiemers. En een stelregel is dat je zaden 2 keer zo diep zaait als dat de eigen grootte van het zaad is. En dat is leuk verzonnen bij Lathyrus, die kun je rustig onder bijna een centimeter grond bedekken. Maar wat te doen bij zaden van soorten als Mimulus, Lobelia, Nicotiana, Verbascum, etc., waarvan er meer dan 10.000 zaadjes in een gram zitten, zo klein?
Als je die zaden 2 of 3 keer hun eigen grootte als diepte zaait, liggen ze nog niet eens onder twee zandkorrels. En als die soorten dan toch donker nodig hebben om te kiemen?
Dan zaai je die zaden net als de lichtkiemers, op zaaigrond en bovenop grof zand, vervolgens inwassen met wat water uit de fijne broes van de plantenspuit. En dan afdekken, met bijvoorbeeld dubbelgevouwen krantenpapier. Of wat donker plastic (pas dan goed op dat je wat kleine speldenprikken in het plastic maakt zodat je wel wat water kan blijven geven). Als het eronder maar donker en vochtig is.
En zodra de zaden gekiemd zijn, mag je het plastic of papier weg halen, voorzichtig! en niet gelijk in de volle zon zetten, maar op een relatief donkere en koele plaats eerst opkweken tot de plantjes iets minder gevoelig zijn voor licht en vocht.
Weken
Voor sommige zaden is het goed dat ze kunnen voorweken in warm water, het zijn vaak soorten waarvan de zaadhuid zo dik is dat deze wat opgeschuurd mag worden (scarificatie). Vervolgens kan dan door het doordringen van water door het kiemwit de kiem zelf met de kieming beginnen.
Doe de zaden in een kommetje en giet er 4-5 maal de hoeveelheid aan warm tot heet maar niet kokend water op. Laat de zaden 24 uur weken. Eventueel kun je na een paar uur het water afgieten en weer nieuw warm water toevoegen. En dit kun je een paar keer herhalen. Zodra het zaad gezwollen is, moet het gezaaid worden. Meestal is 1 tot 2 dagen voldoende, maar week zaden in ieder geval niet langer dan 3 dagen voor.
Meestal wordt deze methode samen met scarificatie gebruikt (eerst zaden wat aanvijlen of opschuren en dan in een warmtebad). En soms ook nog wel met de 3 bekende kiemdoorbrekende methoden samen: eerst opschuren, dan in warm water weken, en tot slot zaaien met periodes van grote temperatuurswisselingen. Oftewel simuleren: eerst de herfst met veel wind en regen waardoor zaden worden opgeschuurd door zand, steentjes, etc. Vervolgens meer herfst en vooral ook winter met veel regen en later sneeuw waardoor vocht in de zaadhuid kan doordringen. En in die winter ook een lage temperatuur die dan vervolgens in de lente gevolgd wordt door warmere temperaturen.
En zo heb je in een beperkt aantal weken een volledige winter nagebootst. Bedenk wel dat je scarificatie in 1 dag kunt doen. En in water weken is ook snel gebeurd. Maar het uiteindelijke stratificeren (de temperatuurswisselingen) hebben een langere periode nodig; vaak wel enige weken tot zelfs enige maanden
In het hoofdstuk Zaaibeschrijvingen staan op alfabetische volgorde een aantal zaaibeschrijvingen van planten. Nog lang niet klaar hoor, ik probeer zo af en toe weer nieuwe zelfgeprobeerde soorten er bij te schrijven, maar wellicht toch handig om even te kijken of een soort die je zelf wilt gaan zaaien er tussen staat. Je zult daar ook weer de termen lichtkiemer, donkerkiemer. koudekiemer, etc. tegenkomen.
Maar ik hoop hier al een beetje duidelijk te hebben gemaakt waarom er koudekiemers, etc. zijn, en wat het betekent.
Source:
Zaden hebben dus de juiste behandeling nodig om ‘gewekt’ te worden, voor sommige soorten is dat veel licht en lucht en niet te veel vocht, voor anderen juist een donkere omgeving en meer vocht, of meer of minder warmte, of voor sommigen een lange tijd en voor sommigen een koude periode. etc..
En de zaden moeten natuurlijk goed van kwaliteit zijn; rijp geoogst, goed gedroogd, zonder sporen van schimmels, niet te oud, niet te warm of te vochtig bewaard, etc..
Source:
Olive oil: for medicinal salves and oils: shelf life 12 to 18 months
You want your herbs and oils to steep between 95-110F. Use a thermometer or the feeling of bath water; warm instead of hot. Cover the olive oil over the herbs, make sure that everything is saturated
Calendula oil has antifungal, anti-inflammatory, and antibacterial properties that might make it useful in healing wounds, soothing eczema, and relieving diaper rash. It’s also used as an antiseptic.
How to make a medicinal salve:
1 cup of medicinal herbal oil and 1/4 cup of beeswax (add to start off with 10 drops of essential oil of choice) or
1/2 cup of medicinal herbal oil and 1/8 cup of beeswax (add to start off with 10 drops of essential oil of choice)
Put the burner on the lowest setting
And give it periodically a little stir until all the beeswax is melted
Test the medicinal herbal salve in the making, add a spoon of it on a plate, and put it for about a minute in the freezer.
Test if the consistency of it:
If it is a little runny put a bit more beeswax to it and if your salve is really too hard and almost too thick to spread then you can just add a little bit of olive oil.
Perfect consistency:
You can get some on your finger very easily, and it rubs in beautifully and spreads beautifully on your skin.
Bacterial Vaginosis and Vaginal Yeast Infections
In one study, researchers compared calendula ointment to metronidazole in 80 women who had been diagnosed with bacterial vaginosis. After one week, both groups were cured of bacterial vaginosis and none had any side effects.
The researchers concluded that if people wanted to avoid taking medications to treat bacterial vaginosis, calendula ointment could be an option.
One study published in Women and Health found that calendula cream was effective for treating vaginal yeast infections, but that it did not work as fast as the standard medication (clotrimazole) that's used to treat them.
There have been claims that calendula can be used to treat symptoms related to menstruation, but more research is needed.
Calendula-olie heeft schimmelwerende, ontstekingsremmende en antibacteriële eigenschappen die het nuttig kunnen maken bij het genezen van wonden, het verzachten van eczeem en het verlichten van luieruitslag. Het wordt ook gebruikt als antisepticum.
Olijfolie: voor medicinale zalven en oliën: houdbaarheid 12 tot 18 maanden
Je wilt dat je kruiden en oliën tussen de 95 en 110 graden Celsius trekken. Gebruik een thermometer of het gevoel van badwater; warm in plaats van heet. Giet de olijfolie over de kruiden, zorg ervoor dat alles verzadigd is
Hoe maak je een medicinale zalf:
1 kopje medicinale kruidenolie en 1/4 kopje bijenwas (start met 20 druppels etherische olie toe te voegen naar keuze) of
1/2 kopje medicinale kruidenolie en 1/8 kopje bijenwas (start met 10 druppels etherische olie toe te voegen naar keuze)
Zet de brander op de laagste stand
En roer het af en toe een beetje totdat alle bijenwas is gesmolten
Test de geneeskrachtige kruidenzalf in wording, schep er een lepel van op een bord en zet het ongeveer een minuut in de vriezer.
Test of de consistentie ervan:
Als het een beetje vloeibaar is, doe er dan nog wat bijenwas bij en als je zalf echt te hard en bijna te dik is om te verspreiden dan kun je er gewoon een klein beetje olijfolie aan toevoegen.
Perfecte consistentie:
Je kunt het heel gemakkelijk op je vinger krijgen, het wrijft prachtig in en verspreidt zich prachtig over je huid.
Bacteriële vaginose en vaginale schimmelinfecties
In één onderzoek vergeleken onderzoekers calendulazalf met metronidazol bij 80 vrouwen bij wie de diagnose bacteriële vaginose was gesteld. Na een week waren beide groepen genezen van bacteriële vaginose en geen enkele groep had bijwerkingen.
De onderzoekers concludeerden dat als mensen geen medicijnen wilden nemen om bacteriële vaginose te behandelen, calendulazalf een optie zou kunnen zijn.
Uit een onderzoek gepubliceerd in Women and Health bleek dat calendulacrème effectief was bij de behandeling van vaginale schimmelinfecties, maar dat het niet zo snel werkte als het standaardmedicijn (clotrimazol) dat wordt gebruikt om ze te behandelen.
Er zijn beweringen dat calendula kan worden gebruikt om symptomen te behandelen die verband houden met menstruatie, maar er is meer onderzoek nodig.
Source:
What Are the Most Effective Natural Antibiotics?
Certain plant extracts, essential oils, and even foods have antibiotic properties. For example, some food and vegetable extracts can prevent the growth of bacteria in food. This includesgarlic, honey, and certain herbs.
Antibiotics are used to kill or inhibit bacteria growth. Although you might think of antibiotics as modern medicine, they’ve actually been around for centuries. The original antibiotics, like many of today’s antibiotics, are derived from natural sources.
Sometimes, the properties of these natural sources extend beyond the food and can aid in your personal hygiene. Cranberry extract contains antibacterial and antioxidant compounds, making it a home remedy for urinary tract infections (UTIs).
Herbs can be antibiotics, too. A small sampling study of 58 Chinese plants found that 23 had antibacterial properties and 15 had antifungal properties.
A 2014 studyTrusted Source found that an herbal therapy was just as effective as a chemical antibiotic in treating a small intestine bacterial overgrowth disorder.
Keep reading to learn about five popular antibiotics that you can try at home.
Option 1: Honey
Honey is one the oldest known antibiotics, tracing back to ancient times. Egyptians frequently used honey as a natural antibiotic and skin protectant.
Honey contains hydrogen peroxideTrusted Source, which may account for some of its antibacterial properties. It also has a high sugar content, which can help stop the growth of certain bacteria.
Additionally, honey has a low pH level. This works to pull moisture away from bacteria, causing the bacteria to get dehydrated and die off.
To use honey as an antibiotic, apply it directly to the wound or infected area. The honey can help kill off the bacteria and aid in the healing process. If possible, opt for raw Manuka honey. This form of honey offers the most health benefits. You can purchase raw Manuka honey here.
You can also ingest honey to aid in the treatment of internal infections. Simply swallow a whole tablespoon or stir it into a warm cup of herbal tea for a soothing treat.
Honey is generally safe to use on the skin or in the body, though you should never give honey to an infant under 1 years old. Instead, consult your healthcare provider for an appropriate alternative.
Option 2: Garlic extract
Garlic has long been thought to have antimicrobial properties. A 2011 study found that garlic concentrate is effective against bacteria. You can purchase garlic concentrate or extract at your local health food store. You may also be able to make your own by soaking a few garlic cloves in olive oil.
Garlic is generally safe to ingest, but large doses might cause internal bleeding. Up to two cloves per day is considered an acceptable dosage. If you’re taking a garlic supplement, be sure to follow the dosage directions as provided.
If you’re taking blood-thinning medication, consult your healthcare provider before using garlic as an antibiotic. Large doses of garlic can amplify the effects of this medication.
You can also apply garlic concentrate directly to a wound or blemish.
Find a variety of garlic supplements here.
Option 3: Myrrh extract
Many people are familiar with myrrh, but its ability to ward off harmful germs isn’t as widely known.
Researchers in a 2000 study concluded that an extract of myrrh could kill off several everyday pathogens. This includes:
Myrrh is generally well-tolerated, but ingesting it may cause diarrhea. If applying myrrh to the skin, it’s possible to experience a small skin rash. If consumed in large doses, myrrh may cause heart problems.
Myrrh is typically prepackaged, so be sure to follow the dosage instructions on the label.
Buy myrrh extract now.
Option 4: Thyme essential oil
Many all-natural household cleaners use thyme essential oil. This oil has been shown to be especially helpful against antibiotic-resistant bacteria.
In a 2011 study Trusted Source, researchers tested the effectiveness of both lavender and thyme essential oil. Both oils were tested in a pool of over 120 strains of bacteria. The researchers found thyme essential oil to be more effective at killing bacteria than lavender essential oil.
Thyme essential oil is for external use only. You shouldn’t take thyme oil by mouth. Before applying to the affected area, be sure to dilute the essential oil with equal parts carrier oil. Common carrier oils include coconut and olive oils.
Applying undiluted essential oil to the skin may cause inflammation and irritation.
People with high blood pressure or hyperthyroid problems shouldn’t use thyme essential oil.
Purchase thyme essential oil and a carrier oil now.
Option 5: Oregano essential oil
Carvacrol is an ingredient found in oregano essential oil. It has important therapeutic properties that further activate healing in the body when inhaled. Carvacrol in oregano oil has been found to help heal gastric ulcers and reduce inflammation.
To treat fungal infections on your skin, add one drop of oregano essential oil per teaspoon of a carrier oil such as olive or coconut oil . Apply the mixture to the affected area.
You can also diffuse oregano oil in the air to help clear sinus infections. You shouldn’t ingest oregano essential oil or use undiluted essential oil on the skin.
You may also be able to eradicate bacteria in the home with a homemade cleaning agent made of:
- oregano essential oil
- vinegar
- water
- lemon
Buy oregano essential oil here.
Be sure to discuss your interest in natural antibiotics with your healthcare provider. They can help you explore your options and help you weigh the potential benefits and risks of each regimen.
You shouldn’t take antibiotics unless absolutely necessary. Taking antibiotics for the sake of taking antibiotics can lead your body to build up a resistance to the medication. You can learn ways to help prevent antibiotic resistance here.
If your healthcare provider does prescribe you antibiotics, be sure to finish the entire treatment regimen.
Source:
- https://www.soundslikereign.com/soap
- https://allesvoorjeolie.nl/spray-flessen/269-1210-spray-fles-amber-glas-klein.html#/108-flesje_amber_18_din-5ml/337-spray_dop_18_din-neus_spray
- https://allesvoorjeolie.nl/250ml/264-1115-spray-fles-amber-glas-klein.html#/203-flessen_groot-100ml_amber/327-dop_grote_flessen-zwart
- https://allesvoorjeolie.nl/potten-/191-758-pot-amber-glas.html#/234-amber_glas_pot-30ml
- https://allesvoorjeolie.nl/pomp-flessen/182-711-spray-fles-amber-glas-klein.html#/160-pomp_kop_groot-zwart/204-flessen_groot-250ml_amber
- https://allesvoorjeolie.nl/potten-/190-aluminium-potje-5ml.html
Create Your Own Website With JouwWeb